Fit
How to Measure Your T-Shirt Size
Stop guessing from S/M/L. Measure one tee you love and every future order fits.

Stop guessing from a letter
S, M, L, XL. Four letters pretending to be a measurement.
The truth is that a medium from one brand can be a large from another and a small from a third, because there is no shared standard behind the letter - each brand cuts to its own block. This is why you can own three mediums that fit three different ways, and why ordering online so often ends in a return.
There is a way out, and it is almost embarrassingly simple. Forget your "size." Instead, take one t-shirt you already own and love the fit of - the one you reach for first, the one that sits right every time - and measure it flat.
Those four or five numbers are your real size. From then on, you do not order a "medium." You order whatever measurements match the tee you already trust.
This single habit ends size-guessing for good. It works across brands, across countries, across the regular-versus-oversized question, because you are no longer matching a letter to a letter.
You are matching a known-good fit to a size chart. Do it once, write the numbers down, and every future order gets easier.
This guide shows you exactly how: which tee to pick, what to measure, how to lay it flat, and how to read the numbers against a brand's chart. No tailor, no fancy tools, just a measuring tape and ten minutes.
What you need
- A soft measuring tape (the cloth kind for sewing). If you only have a rigid metal tape, a piece of string plus a ruler works too.
- One t-shirt you genuinely love the fit of - your benchmark.
- A flat surface: a table, a bed, or the floor.
- Somewhere to write four numbers down. Your phone notes are perfect.
That is it. You do not need to measure your body for this method, which is the whole point - measuring your body introduces guesswork about how much room a tee should add. Measuring a tee you already love removes that guesswork entirely.
Step one: choose the right benchmark tee
Everything depends on this choice, so do not rush it. Go to your wardrobe and find the t-shirt that fits exactly how you want every t-shirt to fit.
Not the one that is okay. Not the one that used to fit before it shrank.
The one that, when you put it on, you do not think about at all because it just works.
A few checks before you commit to it:
- It fits you now, not two years ago. Skin and bodies change. Pick a current favourite.
- It is the silhouette you want. If your benchmark is a relaxed tee but you are about to order a fitted one, the numbers will not translate. Measure a benchmark in the same family as what you plan to buy.
- It has been washed a few times. A tee shrinks slightly in its first washes, so a brand-new tee measured fresh may not reflect how it settles. A tee that has been through the laundry a handful of times is at its true, stable size.
If you genuinely do not own a tee you love, that is useful information too - it means you have been buying the wrong sizes all along. In that case, borrow the method from our t-shirt fit guide to identify what good fit looks like on you, find the closest thing you own, and refine from there.
Step two: lay it flat and square
How you lay the tee out matters more than people expect, because a wrinkled or twisted tee gives wrong numbers.
- Place the tee on a flat, hard-ish surface. A table or the floor beats a soft bed, which lets the fabric sag.
- Lay it face up, buttoned or zipped if relevant (not relevant for a tee, but worth saying for the habit).
- Smooth out every wrinkle with your hands, working from the centre outward. Do not stretch the fabric - just flatten it.
- Make sure the tee is square: the two sides symmetrical, the front not twisting around to reveal the back seam, the sleeves laid flat and even.
- Pat it down one more time. Any ripple left in the fabric adds a few false millimetres.
A tee measured wrinkled or stretched can be off by a centimetre or more, which is enough to push you into the wrong size. Two minutes of careful flattening saves you a return.
Step three: take the four numbers
These four measurements define a t-shirt's fit. Measure each one flat - that is, across the tee as it lies, not around it. A flat measurement is half the full circumference, and almost every brand size chart is given as flat measurements, so this matches how charts are written.
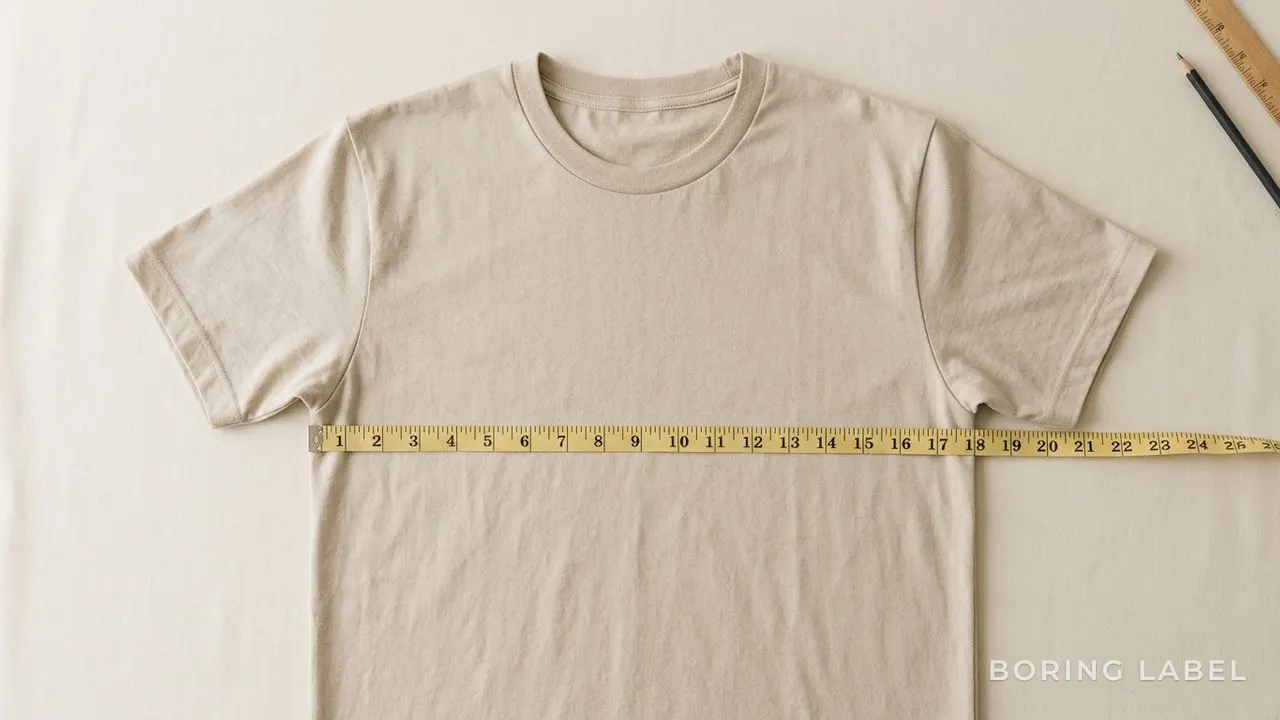
1. Chest (the most important number)
Lay the tee flat. Measure straight across from one armpit seam to the other - from the point where the sleeve meets the body on the left, to the same point on the right. Keep the tape horizontal and pulled straight, not following any curve.
This single number does more to determine fit than any other. It tells you how the tee sits across your chest and how much room you have. If you only get one measurement right, get this one.
2. Body length
Measure from the highest point of the shoulder - right next to the collar, where the shoulder seam meets the neckline - straight down to the bottom hem. Keep the tape vertical and along the front of the tee. This tells you where the hem will land on you: too short and it rides up, too long and it shortens your legs.
3. Shoulder width
Measure across the back of the tee, from the outer edge of one shoulder seam to the outer edge of the other - the two points where the seams sit at the top of each sleeve. This is the number that decides whether the tee frames your shoulders correctly. On a regular fit it should match your own shoulder width closely; on an oversized cut it will be deliberately wider because the seam drops down the arm.
4. Sleeve length
Measure from the shoulder seam (where it meets the sleeve at the top) down along the outer edge of the sleeve to the sleeve hem. This tells you where the sleeve will end on your arm - on the bicep, near the elbow, and so on.
Optional fifth: hem width
If you want to be thorough, measure straight across the very bottom hem, side seam to side seam. Comparing this to the chest width tells you the tee's taper - if the hem is narrower than the chest, the tee tapers in at the waist; if they are equal, it hangs as a straight tube. This is the difference between a shaped fit and a boxy one.
| Measurement | How to take it | What it controls |
|---|---|---|
| Chest | Armpit seam to armpit seam, flat | Overall room, the master number |
| Body length | Shoulder-top to hem, vertical | Where the hem lands |
| Shoulder | Seam edge to seam edge, across the back | Whether it frames your shoulders |
| Sleeve | Shoulder seam to sleeve hem | Where the sleeve ends on your arm |
| Hem (optional) | Bottom hem, side to side | Taper - shaped versus boxy |
Write all five down with the name of the benchmark tee next to them. This little note is now your personal size, more reliable than any letter on a label.
Step four: read a brand's size chart
Now the easy part. When you find a tee you want to buy, scroll to its size chart.
A good chart lists chest, length, shoulder, and sleeve as flat measurements for each size. Compare them to your benchmark numbers and pick the size that matches most closely - leading with the chest.
Handle small mismatches sensibly
The numbers will rarely match perfectly. Here is how to weigh the gaps:
- Chest: the priority. Match this within about a centimetre. If you are between sizes on chest, see the rule below.
- Length: a centimetre or two of difference is usually fine and a matter of taste. Longer if you tuck, shorter if you do not.
- Shoulder: match closely on a regular fit; expect it to be wider than your benchmark if you are buying oversized on purpose.
- Sleeve: the most forgiving. Small differences barely register.
When you are between two sizes
If your chest number sits between two sizes, the tiebreaker is the fabric and the silhouette. A structured, heavier fabric holds shape, so the smaller size will still skim cleanly - size down for a sharper look.
A thin, drapey fabric clings, so the larger size gives a more flattering line - size up. And always size in the direction of the look you want: down for fitted, up for relaxed.
When genuinely unsure, most people are happier sizing up a tee than down, because a slightly roomy tee reads as relaxed while a slightly tight one reads as a mistake.
Account for shrinkage
Cotton tees shrink a little in their first few hot washes, mostly in length. If a chart does not say the measurements are post-wash, assume the tee will lose a small amount of length after a few washes and factor that in - especially on body length, where a borderline-short tee can become genuinely short.
Washing cold and air-drying minimises this, which is one of several reasons our guide to washing t-shirts so they last longer is worth a read. A tee you sized correctly can still end up wrong if the laundry shrinks it past your numbers.
Common measuring mistakes that throw off your numbers
The method is simple, but a handful of small errors are enough to send you back into return territory. Each is easy to avoid once you know to watch for it.
Measuring around instead of across
The most frequent mistake is wrapping the tape around the tee to get a full circumference, then comparing that to a chart written in flat measurements. You will end up ordering a size or two too small because your number is double what the chart expects.
Always measure flat - across the tee as it lies - and compare flat to flat. If a chart genuinely gives circumference, it will say so, and you simply double your flat number to match.
Letting the tape follow a curve
Tees are not perfectly rectangular; the armholes scoop, the hem may curve. If you let the tape dip and follow those curves, you add phantom centimetres.
Keep the tape dead straight between the two points you are measuring, even if that means it floats a little above the fabric in the middle. A straight line between two seams is the honest number.
Stretching the fabric as you measure
Cotton jersey gives, and it is tempting to pull the tape snug against the cloth, which stretches it and inflates the reading. Lay the tape on the relaxed, flattened fabric without tension. The tee is not stretched when you wear it standing still, so it should not be stretched when you measure it.
Measuring the wrong benchmark
If you measure a tee that has stretched out, shrunk, or was never quite right, your numbers inherit those faults and every future order repeats them. This is why benchmark choice in step one matters so much.
A tee that has gone baggy at the collar or short in the body is not a benchmark, it is a cautionary tale. Pick the one that genuinely fits.
Forgetting to log which tee it came from
Numbers without a name are useless six months later, when you cannot remember whether they came from your fitted tee or your relaxed one and you are about to order the wrong silhouette. Always write the tee's name beside its measurements. If you keep more than one benchmark, label each clearly.
Why this method beats measuring your body
The common advice is to measure your own chest, waist, and so on, then match those to a chart. It sounds logical but it has a hidden flaw: a t-shirt is not skin-tight, so a chart based on body measurements has to guess how much extra room - "ease" - to add. Different brands add different amounts of ease for the same body measurement, which is exactly the inconsistency you were trying to escape.
Measuring a garment you already love skips the guesswork. The ease is already baked into the numbers, because they came from a real tee that already fits you the way you want. You are no longer asking "what size am I" - an unanswerable question across brands - you are asking "which of this brand's tees has the same flat measurements as the one I already trust." That question has a clean answer.
Two benchmarks are better than one
Most people want two fits in rotation: a trim one for smart-casual and a relaxed one for easy days. Rather than forcing one set of numbers to serve both, measure two benchmark tees and keep two rows of numbers.
When you shop, you decide first which fit you are after, then match to the matching row. This stops the common mix-up where you order what you think is a relaxed tee against your fitted numbers and it arrives too snug, or the reverse.
Two clearly labelled rows take five extra minutes to build and remove an entire category of ordering error.
A note for couples and gifts
This method is also the most reliable way to buy a tee for someone else without them present. Quietly measure a tee they wear constantly and love, jot the four numbers, and you can order for them across any brand with real confidence. Far better than guessing their "size," which they may not even know themselves.
Build your numbers once, use them forever
Keep your benchmark numbers somewhere permanent - a note in your phone titled with the tee's name and its five measurements. Over time you might build a small set: one row for your favourite fitted tee, one for your favourite relaxed one. Then every online order, regardless of brand, becomes a thirty-second comparison instead of a gamble.
This is the quiet infrastructure of a wardrobe that just works. Once your numbers are set, a well-cut basic like our round-neck tee is a known quantity - you check its chart against your note, pick the matching size, and it arrives fitting the way you expected. No drama, no returns, no second-guessing in the mirror.
If you find your benchmark itself is not quite right - if even your favourite tee has a niggle in the shoulder or the length - circle back to the t-shirt fit guide and recalibrate what good fit means for your frame before you lock the numbers in. Garbage benchmark, garbage results; a good benchmark, on the other hand, pays off for years.
Reading between two brands' charts
Once you have your numbers, the real test is comparing them across brands that label sizes differently, because this is where the letter-based system falls apart most obviously. Imagine your benchmark chest measures fifty-two centimetres flat.
One brand calls a fifty-two-centimetre tee a medium; another calls it a small; a third labels it large because they cut roomy. If you shopped by letter you would own three different fits.
By the chart, you simply find the row closest to fifty-two on each and order it, whatever letter sits next to it.
This is liberating once it clicks. You stop having a "size" and start having a target number, and the letter becomes irrelevant noise.
It also makes international shopping painless, since a brand cutting to a different regional standard is just another chart to compare your number against. The tape does not care what country printed the label.
When charts are missing or vague
Some listings give only a vague size guide or none at all. Treat that as a yellow flag about the seller, not a reason to guess.
If there is a chart but it lists only chest, you can still order with reasonable confidence, since chest is the master number - just accept slightly more uncertainty on length and shoulder. If there is no chart at all, look for the measurements in the reviews, where buyers often post them, or message the seller.
A brand that cannot tell you its flat measurements is a brand worth being cautious with, because it suggests they are not paying attention to the very thing that determines whether their tee fits.
The takeaway
The S/M/L system is a convenience for shops, not a service to you. It collapses the four numbers that actually decide fit into one vague letter, and then that letter means something different at every brand. No wonder ordering blind feels like a coin flip.
The fix is not more careful body-measuring or more reviews-reading. It is to stop treating "your size" as a letter and start treating it as a set of measurements taken from a tee you already love.
Lay it flat, take the four numbers, write them down, and match them to any chart you meet. Do that once and you have quietly solved t-shirt sizing for the rest of your life.
Fewer returns, fewer regrets, and a wardrobe of tees that fit. That is what ten minutes with a measuring tape buys you. It is the least glamorous, highest-return habit in the whole business of buying clothes well.
Boring Label
Wear the point of the article.
One honest tee. Heavyweight combed cotton, a collar that holds, a fit that actually fits. No logo, no noise.
Shop the round-neck teeFree shipping across India · Easy returns
Keep reading

T-Shirt Fit for Tall and Short Men: Length Guide
Why the same size fails tall and short men in opposite directions - and how four measurements fix it.

Round Neck vs Crew vs V-Neck: Which Suits You
Round, crew or V-neck? How each neckline reads against your face and build - and the honest everyday pick.

T-Shirt Fit Guide: How a Tee Should Actually Fit
Most tees fail at the shoulder, not the size label. Here is how a t-shirt should actually sit on your body.
Stay in the loop
New writing, no noise
Occasional notes on fit, fabric, and dressing simply well. No spam, unsubscribe anytime.
Subscribe